
During Google I/O 2017, the company’s CEO Sundar Pichai announced an initiative called Google Lens which is designed to bring up relevant information using visual analysis. Lens is quite similar to Google Googles, but this time it brings higher capabilities due to its vision based computing routines. Google have promised to ship its Lens innovation in Google assistant and photos, but it will be exclusive only to Pixel device. Luckily, there is a way to enable Google Lens on non-pixel Android phones, but we’ll get into the how to thing later.
So how does Google Lens work? Assuming you run into an “object” let’s say a cover photo of “Albert Einstein” and you want to know more about the picture, then you can use the Google Lens from your Assistant or Photos and point your device’s camera to the image. Lens will attempt to identify the photo and show relevant search results and information. Lens also let’s you connect to a Wi-Fi source, provided you’re able to scan the network name and password. Before now, one can easily get Google Lens on their Photos by using Google Lens Launcher apk. But an xda member by the name “ZeevoX” have created a flashable zip that enables Google Lens in Google Photos provided your Android device is rooted. So here’s how to get Google Lens in Google Photos on any Android phone.
Enable Google Lens in Google Photos
To begin with, ensure that your Android device is rooted and have twrp recovery or any other custom recovery safely installed in it. Next up, update Google Photos to the latest version then download the flashable zip file of Google Lens installer from here. Place the file on your sdcard and reboot into twrp recovery. Now tap on ‘Install Zip; then locate and flash the zip file in recovery. You don’t need to clear cache or data, so simply reboot your Android phone and you’re good to go.

If you don’t like the “old fashioned” way of flashing zip files, then you can alternatively use magisk manager to make things easier. So to get this one going, simply download the magisk module file of Google Lens installer created by flint2 from here. Then open magisk manager app and swipe out from the left edge of the screen. Now, tap on “Modules” then click on the + icon located at the bottom. From here, select the module file you downloaded earlier and tap “Open” to begin the installation process. Once it’s done, reboot your Android phone.
How to Use Google Lens
Before your device boots back on, Google Lens would have been integrated in Google Photos. So let’s see how Google Lens works on Android. Open Google Photos from your device’s app drawer, then select any photo of your choice. From here, tap on the Lens icon in the bottom menu’s toolbar. You’ll be taken to an initial introduction, simply tap on “Get Started” to complete the setup.
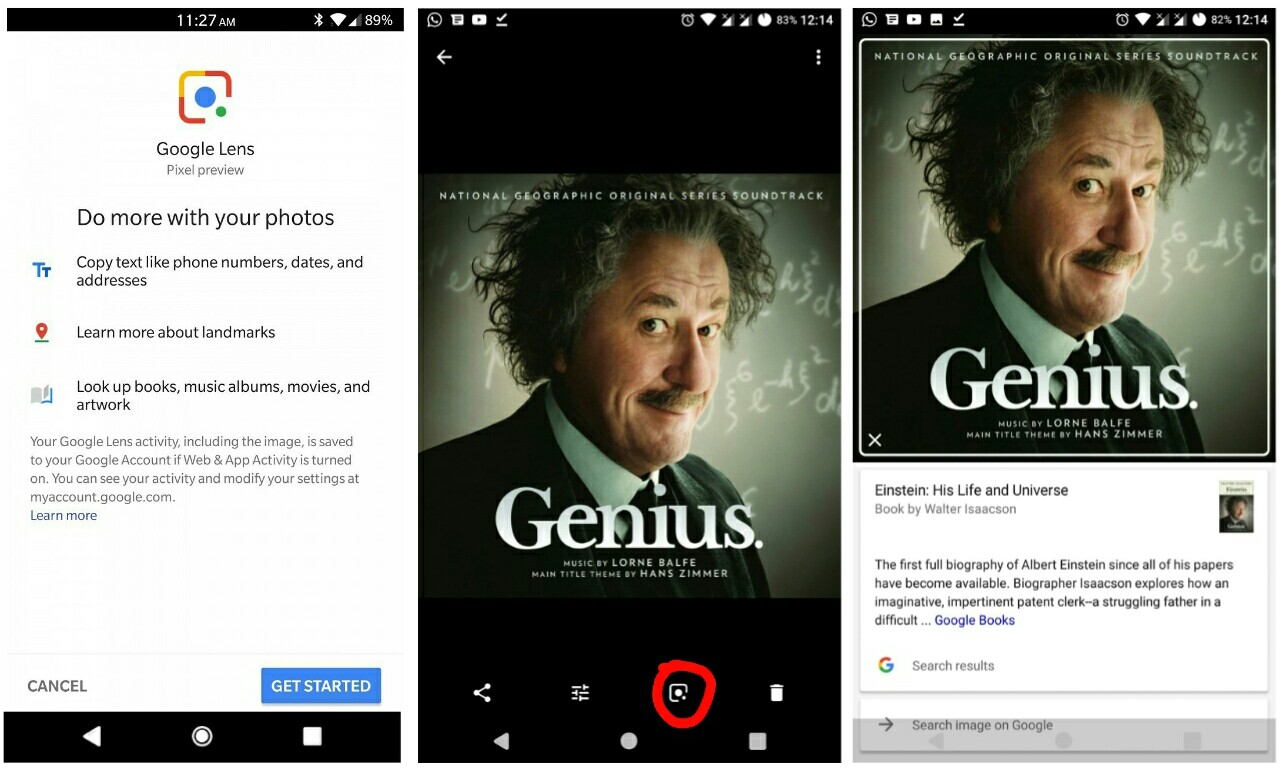
Now Google Lens will automatically identify the photo and it will show you relevant information and search result relating to it. That’s it, you’ve successfully integrated Google Lens in Google Photos and next up we’ll see if there’s anyway to get the Lens feature without rooting. We’ll also try to see if there’s anyway to enable Google Lens on Google Assistant since all the guides so far seems abortive.